Originally built for SAMI and appeared in the January 2006 issue. The Editor was quite surprised by this review!
This is a limited re-release of one of Italeri's older models, being the only Br.20 produced in this scale. It is a basic but fairly sound kit that can be improved dramatically. As a result of the limited release policy, the moulds have stood the test of time quite well and there is hardly any flash, although there are a few sink marks present. The worst culprits are found on the clear nose parts. The kit is covered in rivet detail, even where it should actually be fabric, such as on the tail surfaces and some sections of the wings. The raised panel lines should be re-scribed. The fuselage doors and bomb bay panel lines are quite deeply engraved, but the weakest feature of this kit are the engine cowls. They are moulded integrally with the wing halves and has excessive and inaccurate detail. There are two choices to make. Replace them completely or carefully separate them and fill and re-scribe the detail. Another feature that does not work too well is the exaggerated fabric effect on all control surfaces. With the plastic being fairly soft it is easy to work. The wheel wells are cavernous, so make some plasticard sidewalls to close it off, if necessary. The clear parts are not too bad, although the mid fuselage turret is completely wrong. Falcon have produced a replacement canopy set for this aircraft that will help improve the clarity and accuracy. However, it will expose the rather minimal detail found inside!
Construction.
This kit allows you to do one of two versions. Most would probably go for the 'streamlined' M model. I decided to build the earlier snub-nose variant. After attaching the clear nose parts to each fuselage half, I installed and masked the side windows, assembled and painted the interior in its entirety with Interior green, save the instrument panel, which was black (the seats and control column can be added later). Another task beforehand was to add some Milliput into the tail end cavity of each fuselage, to enable a correction later on. The mid turret was cut in half horizontally. The lower section was glued in place and with the nose turret also nestled in place, the fuselage halves were joined together. Each wing halves were glued together and the cowls carefully separated. The openings left on each wing were closed off with plasticard discs, to which short lengths of sprue were used to attach the kit engines. The improved cowls can now be slid over the engines, leaving a more realistic looking gap around the rear. With the rivet detail removed from each wing and the fabric effect sanded off the ailerons, new panel lines are scribed before attaching them to the fuselage.
The tail surfaces are treated in a similar way. The vertical fins are too short, so the fins were made 2mm taller by adding plasticard to the base. The rudders should have much deeper mass balances and a rounder leading edge, so again plasticard was used and the corresponding area removed from the fin. The horizontal tail surfaces are quite accurate in shape, only the squared off leading edge of the mass balances needed to be made rounder, just as on the rudders. The fin struts are left off until painting was completed.
The rear of the fuselage is too long for the early variant. It should protrude just beyond the rear edge of the elevators, which in turn should not have the faired fillet, all this detail is removed. The previously added Milliput will give strength.
The lower machine gunner tray can be posed open, but due to lack of internal detail, is best left closed. The deeply engraved panel lines for the doors, bomb bay, flaps etc were partially filled. After installing the rest of the cockpit detail, the main canopy is glued in place. It is then masked, along with all the other clear parts.
Colour options.
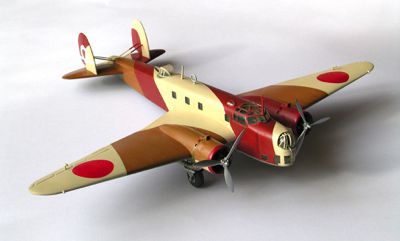
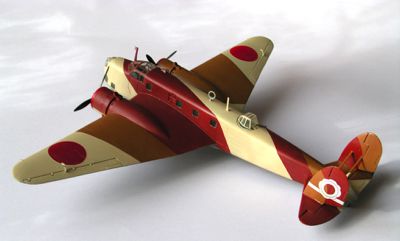
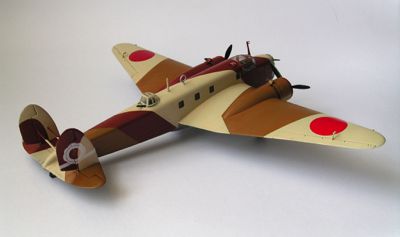
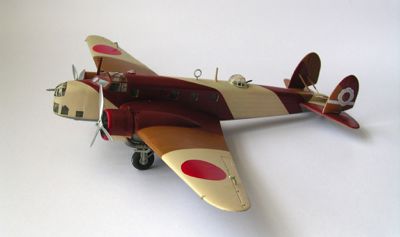
The are 5 schemes offered on the decal sheet. Two Japanese, 1 Spanish Civil War, 1 Regia Aeronautica and 1 Luftwaffe. Having chosen one of the Japanese schemes, the instruction sheet was non-specific for colours, so I did a bit of research and found that the scheme given was in error, not matching any photos I found. Further searches and an interesting post on a forum seemed to suggest the strong possibility of a scheme using three shades of brown. I could not pass on this, so using the new WEM enamels, I did just that. A three-tone scheme that, on the face of it, seems to be pure conjecture but according to the post referred to I was quite confident about the validity of its source.