These images are of the Italeri 1/72 Macchi C.202 kit. It compares really well against the Hasegawa 1/72 C.202 and is much cheaper. Italeri also do the C.205 in this scale, something that Hasegawa never did.
The kit in the top four images was originally built for SAMI and appeared in the May 2005 issue.
The Kit.
This model is supplied in an end opening box, a competent illustration on the front showing an aircraft with the classic "smoke ring" camouflage. There are two very nicely rendered colour profiles on the back, showing the two other schemes provided on the nicely printed decal sheet. Alongside these profiles are colour chips, with matches from the Model Master range as well as FS numbers. The model itself comes on two crisply moulded sprues, showing good attention to detail, especially the panel engraving, which is as good as any of the Japanese offerings. The logical breakdown of parts allows for Italeri's companion C.205 Veltro kit. Only the fabric effect is a bit of a let down, being heavy handed, especially on the rudder and stabilisers. At this scale, it should be very subtle. There is also some raised rivet detail on the wings, which is best sanded off completely. There is some internal detail, but it's rather basic. Super-detailers may wish to use some of the widely available detail sets, especially for the wheel wells. There are two types of stabilisers, with or without mass balances. The instructions offer the balanced versions as an alternative.
Instructions.
The black and white instruction sheet is of the concertina map-type, complete with a brief history in 10 languages. A sprue layout diagram and a nicely drawn, easy to follow, assembly sequence is on one side. The three colour schemes, complete with numbered decal application, are on the flip side. Letters are used to indicate colour, which again are taken from the Model Master range.
Construction.
Starting with the cockpit, ignore the painting instructions, which would have you painting the armoured seat black! It should be silver, as is the control column and the armour plated head rest. The moulded harness is normally a khaki colour, not field green as indicated. Italeri suggest an overall interior of light grey, not the usual pale interior green colour normally associated with this aircraft. Both colours are correct, if photos of preserved aircraft are anything to go by! Italeri also suggest assembling the propeller unit at this stage, but that can be left until later if wished. This means the fuselage halves can be quickly joined together, followed by all the other main components. The one slight problem is ensuring a good join between the fuselage and upper wing parts. In fact a small amount of filler was used. I also assembled the undercarriage, making sure the wheel still rotate. This will make them much easier to paint. The two cooler fairings were also fixed in place, although I did wonder about the shape of the nose fairing. It has quite a pronounced taper towards the back which did not match with various references very well. The wheel wells have very simplified detail that is ripe for improvement, with either scratch building or using one of the many etch detail sets that are available. The canopy is split, so there is the opportunity to pose it open. Offering up the spinner base plate shows problems with the nose contours, which do not match up very well. I scribed the shape of the spinner plate onto the fuselage front and carefully re-profiled the nose to match. It meant the removal of the small intakes on the lower cowl, but they were over-scale anyway (and probably contributed to the problem in the first place!). The shape of the stabilisers seemed suspect too. They looked slightly 'square'. A few strokes of wet dry soon sorted that out.
Accuracy.
The model dimensions are as follows. Span: 145mm, length 120.5mm and a height of 40mm, including the mast. The kit scales out to 10.4m span, 8.67m length and height of 2.88m. With no details on the sheet, dimensions sourced elsewhere give a span of 10.58m, 8.85 length and height of 3.03m, which is very nearly spot-on, the kit being only 0.25 mm under in all dimensions. The kit perfectly captures the look of this aircraft.
Colour Options.
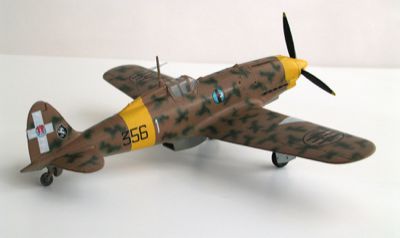
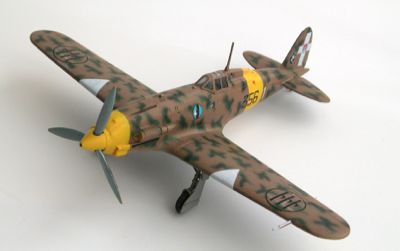
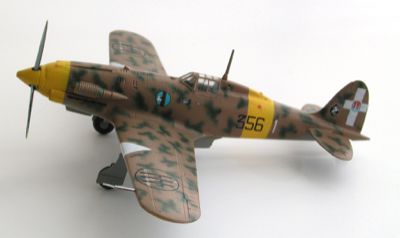
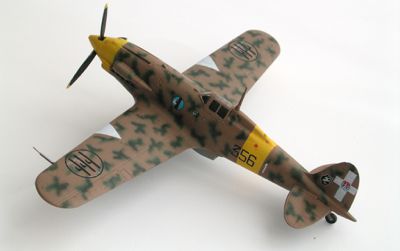
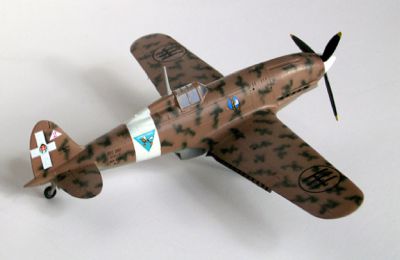
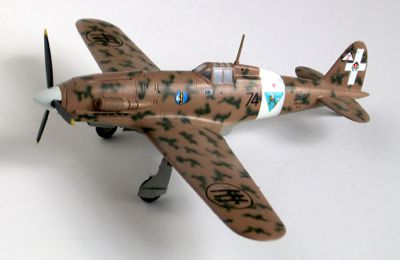
Three schemes are provided. Two have the late Macchi applied 'smoke ring' scheme (85ª Sq. 3° Stormo, Libya 1942 & 374ª Sq.). My choice was the third option, a Breda built aircraft (356ª Sq. 21° Gruppo Autonomo, Russia 1943), that saw brief service on the Baltic front, hence its yellow nose, fuselage band and white wing triangles. It is quite an interesting, alternative scheme that is still a bit tricky to do well, but easier than the smoke rings, which is always a challenge in 1/72 scale! A white base is prepared for the yellow areas, not forgetting the propellor tips. The yellow fuselage band is provided as a decal, but to ensure a good match to the other areas, I decided to spray it instead. When dried they were masked with Tamiya tape, as was the canopy, and the lower camouflage colour was sprayed using Xtracolor X134. The upper base colour was sprayed using Xtracolor X104 and the mottles applied with X109. Silver was then dry-brushed on the undercarriage units and the tape removed to reveal the completed camouflage ready for decaling.
Decals.
The comprehensive decal sheet is very well done and I had no problems applying them to the glossy Xtracolor surface, although the white triangle decals were not totally opaque (I should have sprayed them). There was no silvering, except were the roundels did not bed down properly over the moulded rivet detail. It was after application that I came across a photo of the real aircraft and discovered that the placement and size of the aircraft ID numerals were not quite correct. It appears they should be a tiny bit bigger, more spaced and the positioning of the white "1" should mirror the port side, i.e: just beyond the rear edge of fuselage band. Another correction prompted by the photo was to apply a "celeste" pale blue to the propellor fronts, not black as seen on other aircraft of the same unit. I used Xtracrylics Satin varnish to seal everything in.
Conclusion/ Recommendation.
It is good to see that Italeri have resumed making models from this era of aviation. The Folgore is a sound choice, being perhaps their most famous WWII aircraft (next to the S.79 Sparveiro, of course). What more, it is accurate, should be widely available and is good value for money. The relative ease of construction is countered by the less than easy camouflage application. Nearly all were mottled in a bewildering range of styles. Anyone armed with good references (and airbrush) should still have plenty of fun with this model and with all the aftermarket items around, should be able to further embellish and improve what is already a sound model out of the box. This model earns a very high recommendation indeed.
Many thanks to Italeri for the review sample.